A bioactive terrarium is a sealed or semi-sealed glass habitat that functions like a miniature ecosystem — with a living clean-up crew of tiny invertebrates breaking down waste, live plants cycling moisture and nutrients, and a substrate designed to support it all indefinitely. Once it’s dialed in, it barely needs you.
If you’ve only ever seen sterile reptile tanks — paper towels on the bottom, a plastic hide, a single bowl — a bioactive setup feels like a different hobby entirely. It looks like a slice of jungle. It smells like soil. And it reshapes how the animal inside behaves, because for the first time they’re in something that resembles the place they actually evolved to live.
This guide walks you through everything: what makes a terrarium bioactive, how the clean-up crew works, what to put in each layer, which animals thrive in one, what it costs in Canada, and the mistakes beginners make most often. It’s the same approach we use to build every enclosure for the live animals on our team — and the exact method we teach in our hands-on terrarium workshops across the GTA.
Key Takeaways
- A bioactive terrarium is a living ecosystem — layered substrate, live plants, and a clean-up crew of isopods and springtails that break down waste automatically.
- It replaces sterile keeping. Less daily maintenance, better animal welfare, and a habitat that looks and smells like real nature.
- The standard layer stack is: drainage layer → substrate barrier → ABG mix → leaf litter → plants → clean-up crew.
- Start-up cost in Canada runs roughly $150–$400 depending on enclosure size and species choices.
- Works best for tropical and humid-loving species — crested geckos, dart frogs, day geckos, and many tarantulas. Not ideal for arid-desert setups without modification.
What Is a Bioactive Terrarium?
A bioactive terrarium is an enclosed habitat containing three interdependent biological elements: live plants, live invertebrate decomposers (isopods and springtails, almost always), and a layered living substrate that supports both. The three elements form a closed nutrient cycle. Plants take up waste nutrients. Isopods and springtails break down dropped food, feces, and dead plant matter. The substrate hosts the microbes that finish the decomposition.
The result is a habitat that largely maintains itself. Most bioactive keepers spot-feed the clean-up crew occasionally, mist or water the plants, and top up leaf litter every few months — and that’s it. No substrate changes every three weeks. No bleached-out plastic hides.
Critically, a bioactive terrarium is not just “a terrarium with dirt in it.” Dirt alone goes anaerobic and sours within weeks. What makes it bioactive is the clean-up crew — the living organisms that keep the soil aerated, the waste processed, and the system stable. Without them, it’s just a planted tank on borrowed time.
How the Clean-Up Crew Actually Works
The two standard clean-up species are isopods (land-dwelling crustaceans — woodlice, roly-polies, pill bugs) and springtails (tiny white hexapods, under 2mm). They occupy different ecological niches, and you want both.
Isopods — the bulk processors
Isopods eat decaying plant matter, reptile waste, uneaten food, and dead clean-up crew members. They reproduce slowly but steadily, and they burrow — which aerates the substrate and prevents it from going anaerobic. Common bioactive species in Canada include dwarf whites (Trichorhina tomentosa), powder blues, powder oranges, and zebras.
Springtails — the mold police
Springtails eat mold, fungus, and microscopic biofilm before it can colonize the surface. They reproduce fast — a starter culture of 100 can become thousands in months — and they thrive in the exact humid conditions that would otherwise grow mold. A well-seeded springtail population is the single biggest reason bioactive enclosures don’t develop fuzzy white mold problems.
Together, isopods and springtails form a complete decomposition service. Skip one and the system limps; skip both and you’re just running a sterile setup that happens to have dirt in it.
The Layers of a Bioactive Terrarium
Every bioactive build uses the same layered structure, from bottom to top. The depths and materials shift depending on whether you’re building for a tropical frog or an arid-species lizard, but the order doesn’t.
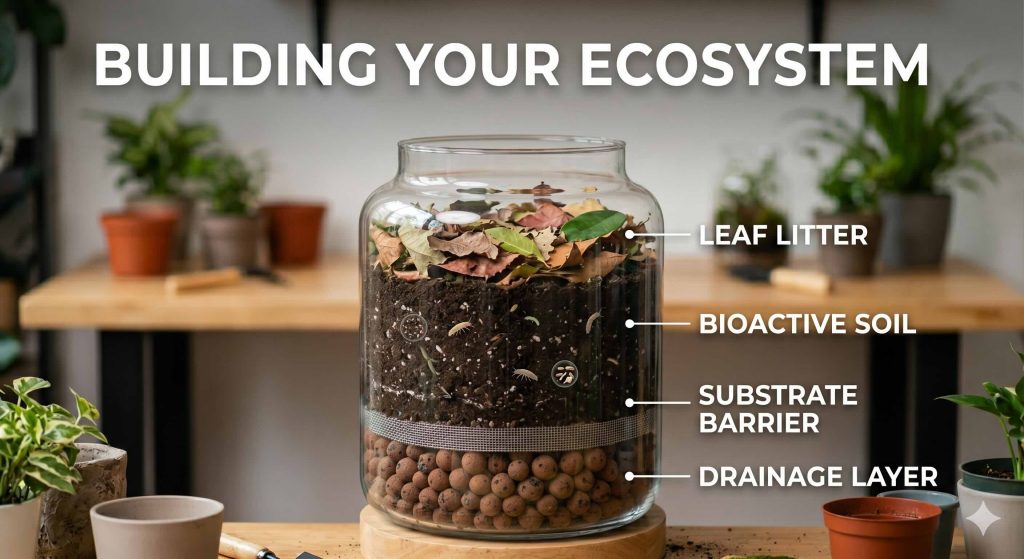
| Layer | Purpose | Typical depth | Common materials |
|---|---|---|---|
| 1. Drainage | Holds excess water below the root zone so the substrate above doesn’t waterlog | 1–3 inches | LECA clay balls, lava rock, or a false bottom |
| 2. Substrate barrier | Prevents substrate from settling into the drainage layer | Single layer | Mesh screen or weed-barrier fabric |
| 3. Bioactive soil | The main substrate — hosts plants, isopods, microbes | 3–6 inches | ABG mix (fir bark, peat, charcoal, tree fern, sphagnum) or a DIY blend |
| 4. Leaf litter | Food source for the clean-up crew and cover for isopods | 1–2 inches, refreshed periodically | Dried magnolia, live oak, or sea almond leaves |
| 5. Plants & hardscape | Structure, enrichment, humidity cycling | — | Live tropical plants, cork bark, driftwood, stones |
| 6. Clean-up crew | Decomposition and soil aeration | Seeded throughout | Isopods + springtails |
The ABG mix in layer 3 (named after the Atlanta Botanical Garden, which developed it for orchid display) is the gold standard. It drains well, holds moisture without waterlogging, resists compaction, and supports both plants and decomposers. Most Canadian reptile suppliers stock it pre-bagged, or you can mix it yourself from the five component ingredients.
Best Plants for a Bioactive Terrarium
The plant list depends on the humidity level your animal needs. For most bioactive builds — which target tropical or humid-temperate species — these are the workhorses.
For tropical / high-humidity builds
- Pothos (Epipremnum aureum) — nearly indestructible, fast-growing, vines along branches
- Fittonia (nerve plant) — compact, colourful, holds shape in the foreground
- Ficus pumila (creeping fig) — excellent ground cover, climbs glass
- Selaginella (spikemoss) — low-growing moss-alternative for moist corners
- Bromeliads (Neoregelia, Vriesea) — hold water in their centres, create frog-friendly microhabitats
- Peperomia — small, succulent-ish, tolerates a wide humidity range
For arid or semi-arid bioactive builds (rare but possible)
- Haworthia and Gasteria — small succulents that tolerate bioactive substrate
- Sansevieria (snake plant) — drought-tolerant, structural
- Tillandsia (air plants) — mounted on cork, no root contact with substrate
A note for Canadian keepers: avoid plants shipped in with persistent pesticide residue. Big-box hardware stores often carry plants treated with systemic insecticides that will wipe out your clean-up crew. Wash roots thoroughly and quarantine-grow plants for 4–6 weeks before introducing them to a bioactive setup with live invertebrates.
Which Animals Thrive in a Bioactive Terrarium?
Not every species benefits from bioactive keeping. For some, it’s a massive welfare upgrade. For others, it’s either unnecessary or actively harmful.
Excellent bioactive candidates
- Crested geckos and other Rhacodactylus species — arboreal, humid, thrive in planted enclosures
- Dart frogs — bioactive is the only sensible way to keep them
- Day geckos (Phelsuma) — tropical, display-oriented, show beautifully in planted setups
- Many tarantulas — especially tropical arboreal and fossorial species
- Tropical isopods themselves — kept as pets in bioactive display tanks
- Small skinks and anoles — tropical species particularly
Possible but requires modification
- Ball pythons — works with a drier substrate mix and hardier isopod species
- Bearded dragons — arid bioactive is doable but finicky; most keepers stick to sterile
- Corn snakes — works, though sterile keeping is still standard practice
Generally not recommended
- Very large snakes (Burmese, reticulated) — mass of animal compresses substrate, crushes plants
- Species requiring dry-as-bone desert conditions with no live plants or invertebrates
- Hatchlings of most species — harder to monitor feeding and waste in a planted enclosure
Bioactive vs. Sterile Keeping: The Honest Comparison
There’s a quiet debate in the reptile community about whether bioactive is categorically better than sterile keeping. The honest answer is: it depends on the species and the keeper. Here’s the trade-off on both sides.
| Factor | Bioactive | Sterile |
|---|---|---|
| Daily maintenance | Very low — spot-feed, mist | Low — remove waste, refresh water |
| Deep cleaning frequency | Rare (years between rebuilds) | Every 3–6 weeks |
| Up-front cost | Higher ($150–$400) | Lower ($30–$80) |
| Long-term cost | Lower (no substrate replacement) | Higher (ongoing substrate purchases) |
| Animal welfare | Closer to natural behaviour, better enrichment | Adequate, but less enrichment |
| Visual appeal | Display-worthy | Functional |
| Illness detection | Harder (waste removed by clean-up crew) | Easy (waste is visible) |
| Humidity stability | Excellent — self-regulating | Requires more active management |
The visibility-of-waste point is worth dwelling on. Because isopods process reptile waste within hours to days, a bioactive keeper can’t rely on “I didn’t see a poop this week” as a health indicator. Experienced bioactive keepers lean more on direct observation of the animal — appetite, behaviour, weight — which is arguably better husbandry anyway, but it’s a shift in mindset.
How to Set Up a Bioactive Terrarium: Step by Step
This is the shortened field version. The same process, hands-on with every material in front of you, is what we run in our in-person workshops — worth mentioning because the feel of the substrate in your hands is something no guide can transmit.
- Clean the enclosure. Dish soap and water, rinsed thoroughly. No bleach residue. Let it dry completely.
- Add drainage. 1–3 inches of LECA, lava rock, or install a false bottom. This layer must be deep enough that excess water can pool below the substrate without touching it.
- Add the substrate barrier. A single layer of mesh or fabric, cut to fit. This keeps your ABG mix from settling into the drainage layer.
- Add the bioactive soil. 3–6 inches of ABG mix (or your DIY equivalent), slightly moistened — damp like a wrung-out sponge, not wet. Shape it with gentle slopes and depressions for visual interest.
- Install hardscape. Cork bark, driftwood, stones. Do this before planting so the plants can fill in around the structure.
- Plant. Start with vertical elements (climbing plants near the back) and finish with ground cover and foreground detail. Water in gently after each plant goes in.
- Add leaf litter. 1–2 inches across the surface. This becomes both clean-up crew habitat and their food source.
- Seed the clean-up crew. Sprinkle springtails across the leaf litter first. Wait 1–2 weeks for them to establish. Then add isopods (typically 25–50 starter adults for a 20-gallon enclosure).
- Let the enclosure cycle. Wait 2–4 more weeks before introducing the target animal. This gives plants time to root, the clean-up crew time to establish a breeding population, and the microbial community time to stabilize.
- Introduce your animal. Welcome to the easiest reptile husbandry routine you’ll ever have.
Common Bioactive Terrarium Mistakes
Most bioactive failures trace back to one of these six missteps. If something’s going wrong, start here.
Skipping the cycling period
Introducing the animal before the clean-up crew establishes is the single most common mistake. A hungry crested gecko eating a starter colony of 25 isopods means your cleanup system never gets off the ground. Wait the full 4–6 weeks.
Over-misting
Tropical does not mean swamp. If water pools on the surface or the substrate looks waterlogged, you’re misting too much — isopods will drown, anaerobic pockets develop, and plant roots rot.
Skipping springtails
Isopods don’t eat mold. Springtails do. Without them, a humid bioactive enclosure will develop a fuzzy white bloom within weeks.
Using pesticide-treated plants
Systemic pesticides from big-box plants will wipe out your clean-up crew — often days after introduction. Always quarantine new plants for 4–6 weeks in a separate setup before adding them to a bioactive enclosure.
Wrong substrate depth
Too shallow (under 3 inches) and isopods don’t have room to burrow. Too deep (over 8 inches) and the bottom layers go anaerobic. Three to six inches is the sweet spot for most setups.
Expecting it to be sterile
It’s a living ecosystem. You’ll see isopods. You’ll see springtails. Mushrooms might appear occasionally (usually harmless — remove them). If you want a pristine, invertebrate-free display, bioactive isn’t for you.
How Much Does a Bioactive Terrarium Cost in Canada?
Prices below are in CAD, accurate as of early 2026, and assume you’re sourcing from a mix of reptile specialty shops (Reptiles Canada, Canadian Reptile Breeders), local hydroponics stores (LECA, fabric), and garden centres (plants — buy organic and quarantine).
| Component | 20-gallon tropical build | 40-gallon tropical build |
|---|---|---|
| Enclosure (glass) | $60–$120 | $150–$250 |
| Drainage layer (LECA) | $15–$25 | $25–$40 |
| Substrate barrier (mesh) | $5–$10 | $8–$15 |
| ABG mix or equivalent | $25–$40 | $45–$70 |
| Leaf litter | $10–$15 | $15–$25 |
| Plants (4–8 species) | $30–$60 | $50–$100 |
| Hardscape (cork, wood) | $15–$40 | $25–$60 |
| Springtail culture | $15–$20 | $15–$20 |
| Isopod starter (25–50 count) | $20–$50 | $35–$75 |
| Total | $195–$380 | $368–$655 |
The 20-gallon build at the lower end is realistic for a first-time keeper who shops carefully. The 40-gallon build at the higher end assumes premium isopod species (powder blues, dairy cows) and a curated plant selection. Long-term, the only recurring cost is leaf litter refresh every few months and occasional plant additions — you won’t be buying bags of substrate every month.
Ongoing Maintenance
A healthy bioactive terrarium demands shockingly little. Here’s the full routine.
Weekly
- Mist tropical setups 2–4 times per week (or run an automated misting system)
- Check that water pooling in the drainage layer isn’t rising into the substrate
- Visual check on plants and animal — any stress, wilting, or behaviour changes
Monthly
- Supplement feed the clean-up crew if the animal isn’t producing enough waste — a small piece of carrot, zucchini, or fish flakes once a month
- Spot-trim plants to maintain shape
- Check leaf litter depth — top up if it’s getting thin
Every 3–6 months
- Refresh leaf litter thoroughly
- Prune aggressive plants (pothos especially)
- Add fresh springtails if the population looks depleted
Rarely (once every 1–3 years)
- Partial substrate top-up if the level has dropped
- Rebuild only if something has gone catastrophically wrong — a properly running bioactive enclosure doesn’t need a full teardown
Frequently Asked Questions
Can I turn an existing sterile enclosure into a bioactive one?
Yes, though it’s usually easier to rebuild from scratch than to retrofit. You’ll need to remove the animal temporarily, strip the enclosure, add drainage and a proper substrate layer system, plant it, seed the clean-up crew, and cycle for 4–6 weeks before reintroducing the animal.
Do the isopods or springtails bite?
No. Neither species has any interest in your animal, and they can’t bite humans either. They eat decomposing matter exclusively.
Will the clean-up crew escape into my house?
Springtails can occasionally wander if humidity gets high and lids aren’t sealed, but populations don’t survive outside the enclosure’s microclimate. Isopods stay put.
How do I know if the clean-up crew is still alive?
Peek under leaf litter or cork flats — isopods cluster there. Springtails are harder to spot but usually visible on damp substrate in the morning. Breeding populations should stabilize within 2–3 months of seeding.
Can I use garden soil instead of ABG mix?
No. Garden soil compacts, goes anaerobic, and often contains pesticides or pests. Stick to purpose-made bioactive substrates.
How often do I need to replace the isopods?
Rarely, if ever — they reproduce steadily in a stable setup. A healthy population becomes self-sustaining. You only add new ones if the population crashes for some reason.
Is a bioactive terrarium safe for kids to interact with?
Yes. The clean-up crew is harmless, and the enclosures are just as kid-safe as any well-sealed terrarium. We actually use bioactive setups in our reptile birthday experiences — they’re more visually engaging than sterile tanks.
Want to Build Your Own?
Reading about bioactive terrariums is one thing. Actually layering substrate, planting ferns, and watching live isopods disappear into leaf litter for the first time is another. We run hands-on workshops across the GTA where you build a complete bioactive terrarium in 90 minutes and take it home the same day — all materials, plants, and clean-up crew included, guided by our team.
Based in Toronto, we deliver workshops anywhere in the Greater Toronto Area — private groups, venue partnerships, corporate team-builds, and adults-only Terrarium & Cocktails nights.